Author Archives: whipwrek

Blocktober 2021

The Last of Us Part II, Scar Island

For Blocktober 2021 I wanted to write about one of my favorite levels I got to work on for The Last of Us Part II: Scar Island.

While “The Shortcut” was the first level I was officially assigned in The Last of Us Part II, the first actual work I did for the project was to build a little Scar Village prototype space. After we finished Uncharted: The Lost Legacy, our Director, Neil Druckmann, gave the team the pitch for the sequel to TLOU and I was immediately drawn to the presentation of the cult-like faction called The Seraphites, or “Scars” as they were also known.

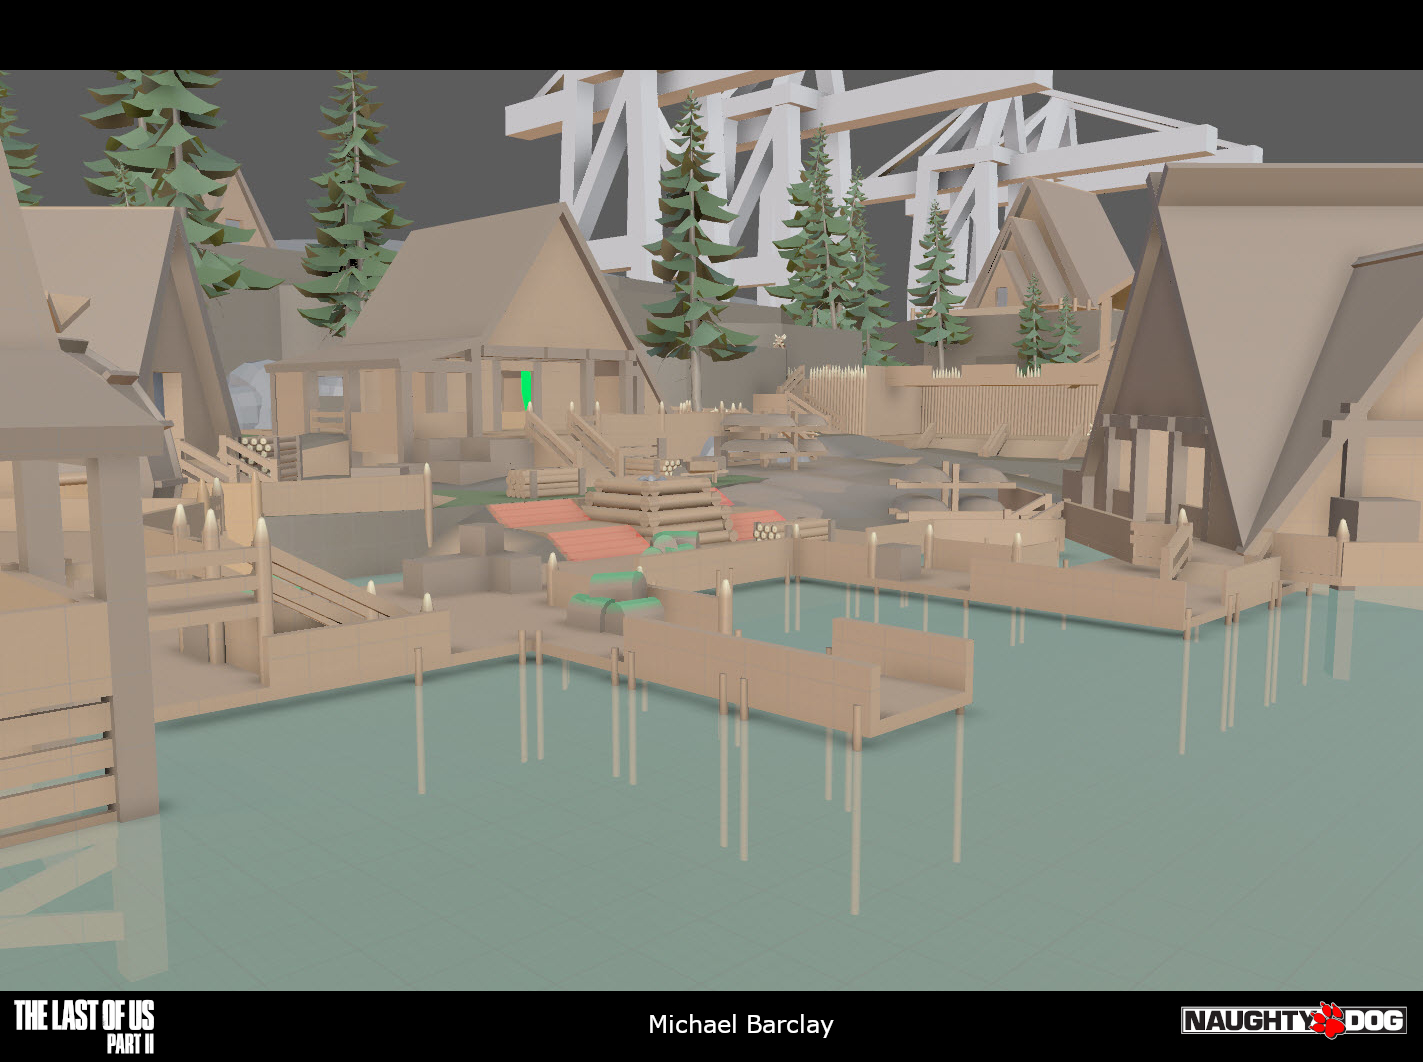
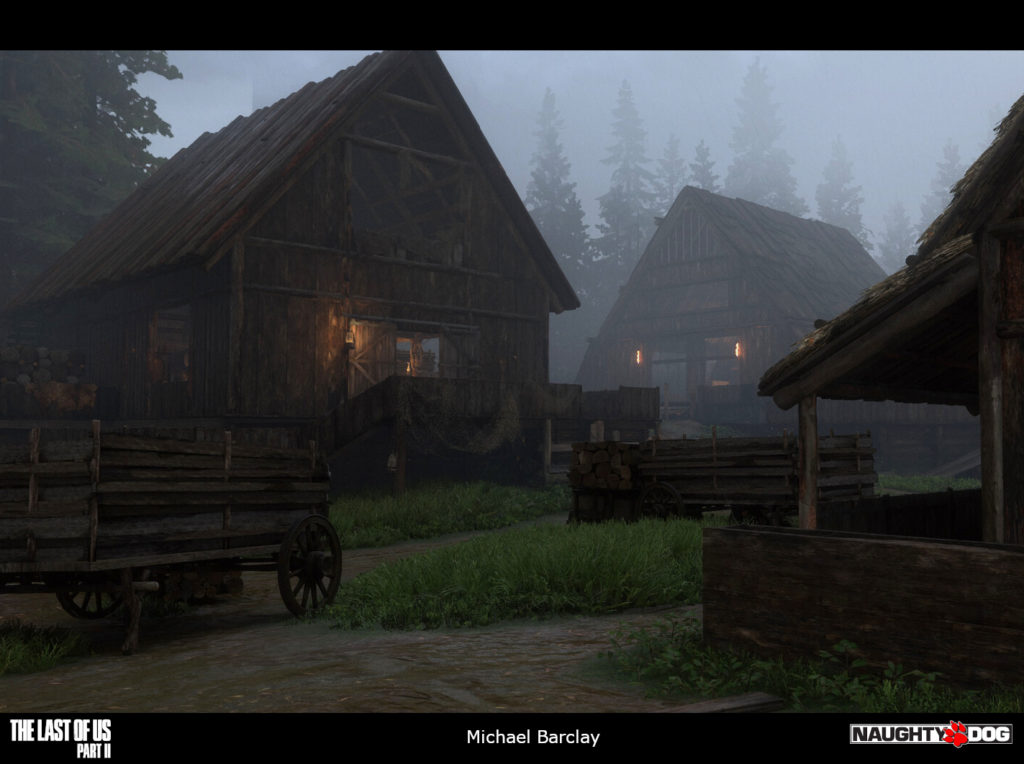
We had a bunch of amazing concepts for the Scars but no one as yet had tackled blocking out any of the structures that would become a core part of their identity: A-Frame shaped buildings that were built out of completely natural materials. The Scars live by a very strict code that prevents them from utilizing “old world” technology in their day to day lives. This means no electricity, no cars, fuel or anything of that sort.

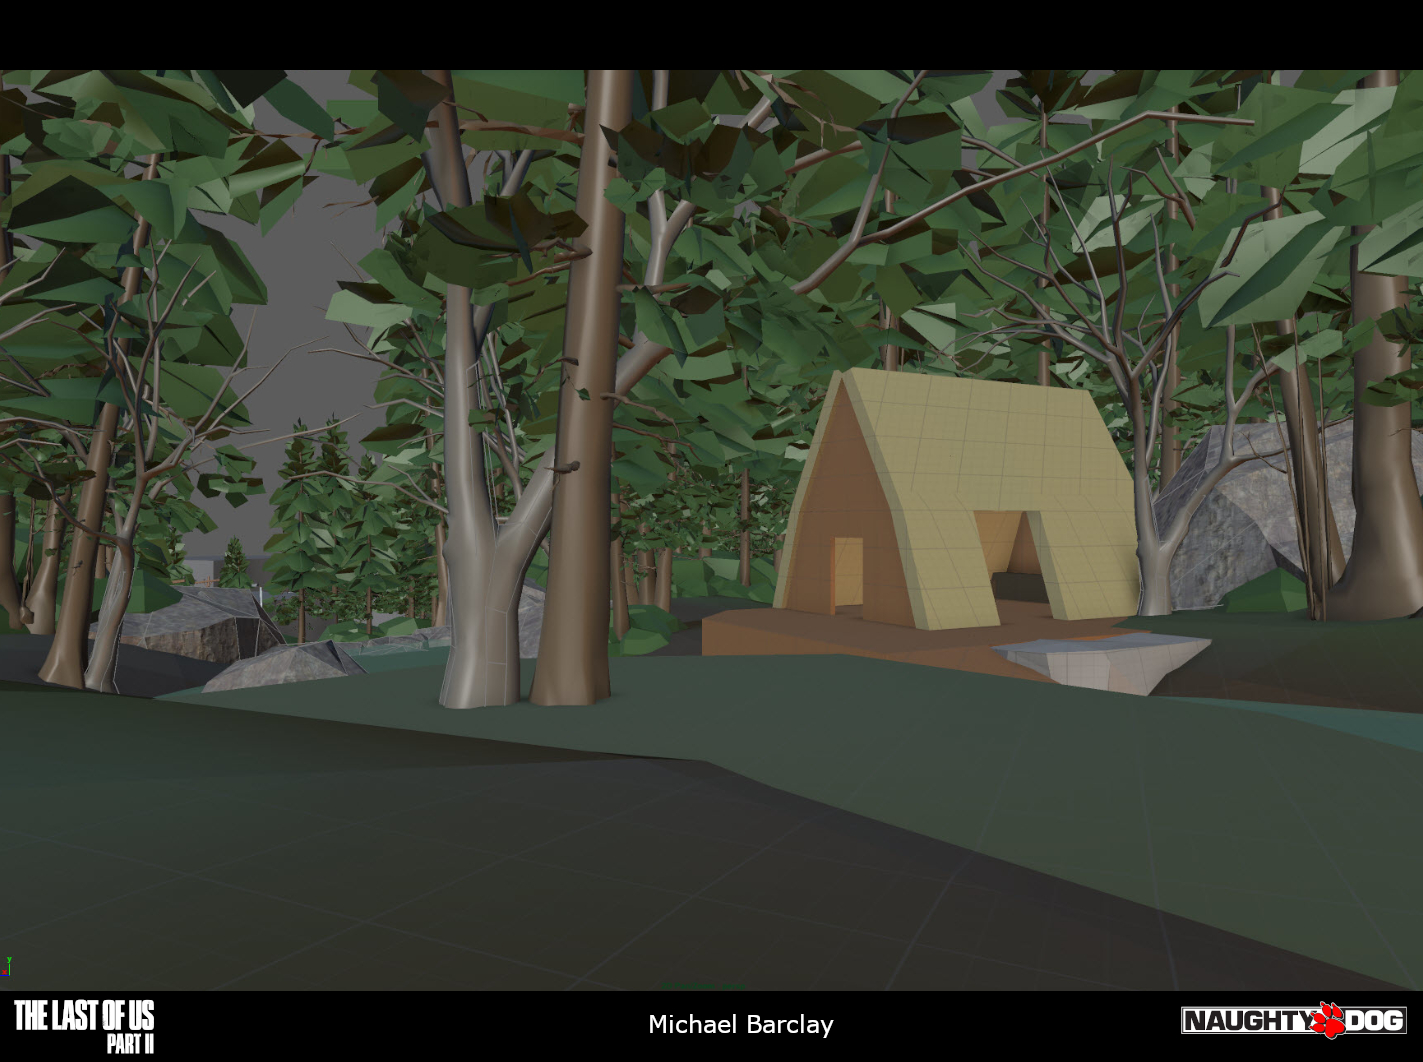
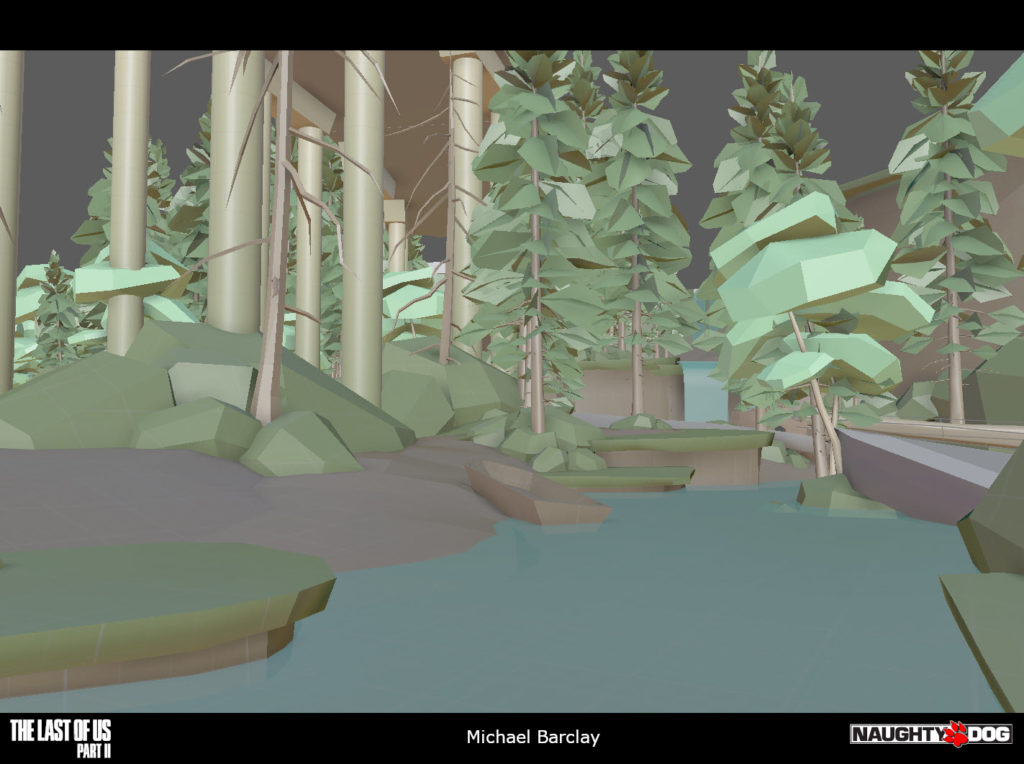
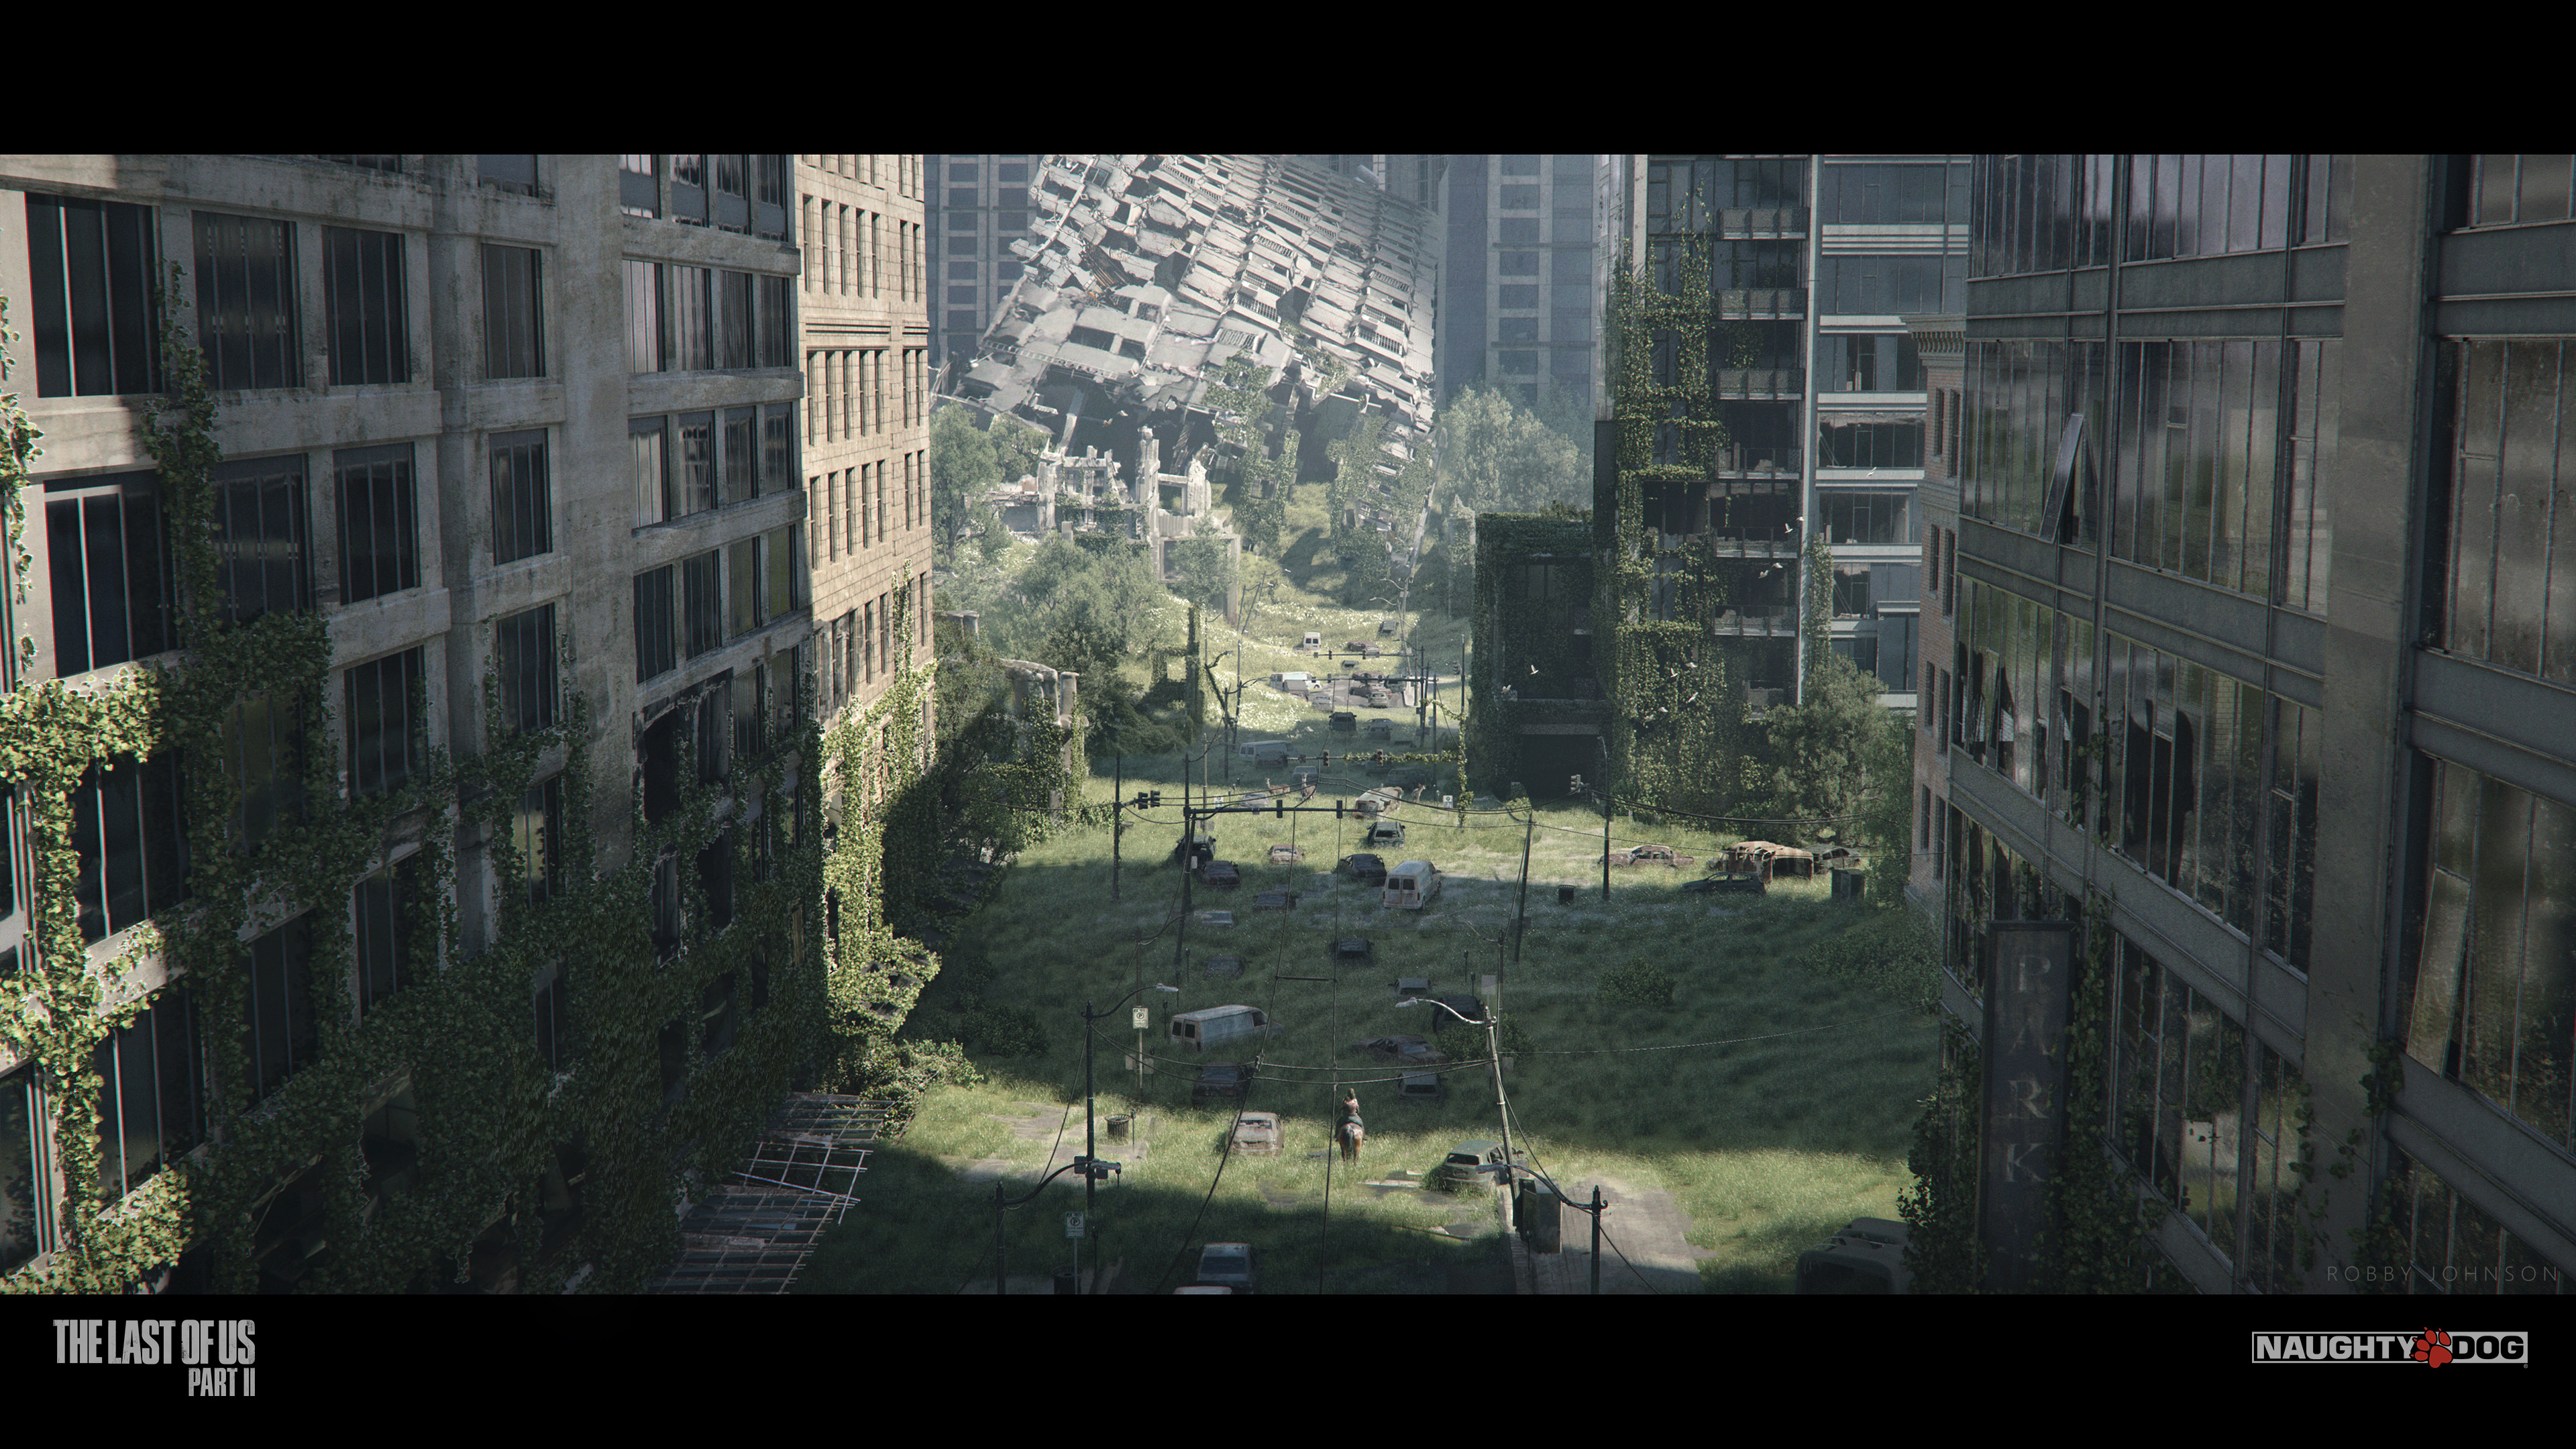
This was very exciting to me as it meant their home, which we decided would be an island protected from the ravages of the infected, would have the potential to be completely unique within the world of The Last of Us. While I was getting up to speed on the project I built a small combat space that would become a testing bed for many prototypes and developed shapes that I carried into many of my final blockouts. I wanted to build as natural an environment as possible to distinguish this level from others set in and around Seattle. You would see brief glimpses of the “old world” poking through the lush overgrowth that had swallowed the island, but for the most part this would feel like stepping into a completely new world.

Another goal for us within Scar Island was to present a different perspective of Scar culture and provide depth and texture to them as a faction. Throughout this level we see lots of examples of everyday Scar life, how they care for each other by hunting and cooking, where they pray and train as well as how they work since not all Scars are fighters.

It was very important to myself and the team that there were always opportunities for the player to avoid combat where possible and so all Scar encounters within this level can be completely “stealthed”. This meant very porous or wide encounter spaces, which actually helped maintain the aesthetic of broad, natural spaces.

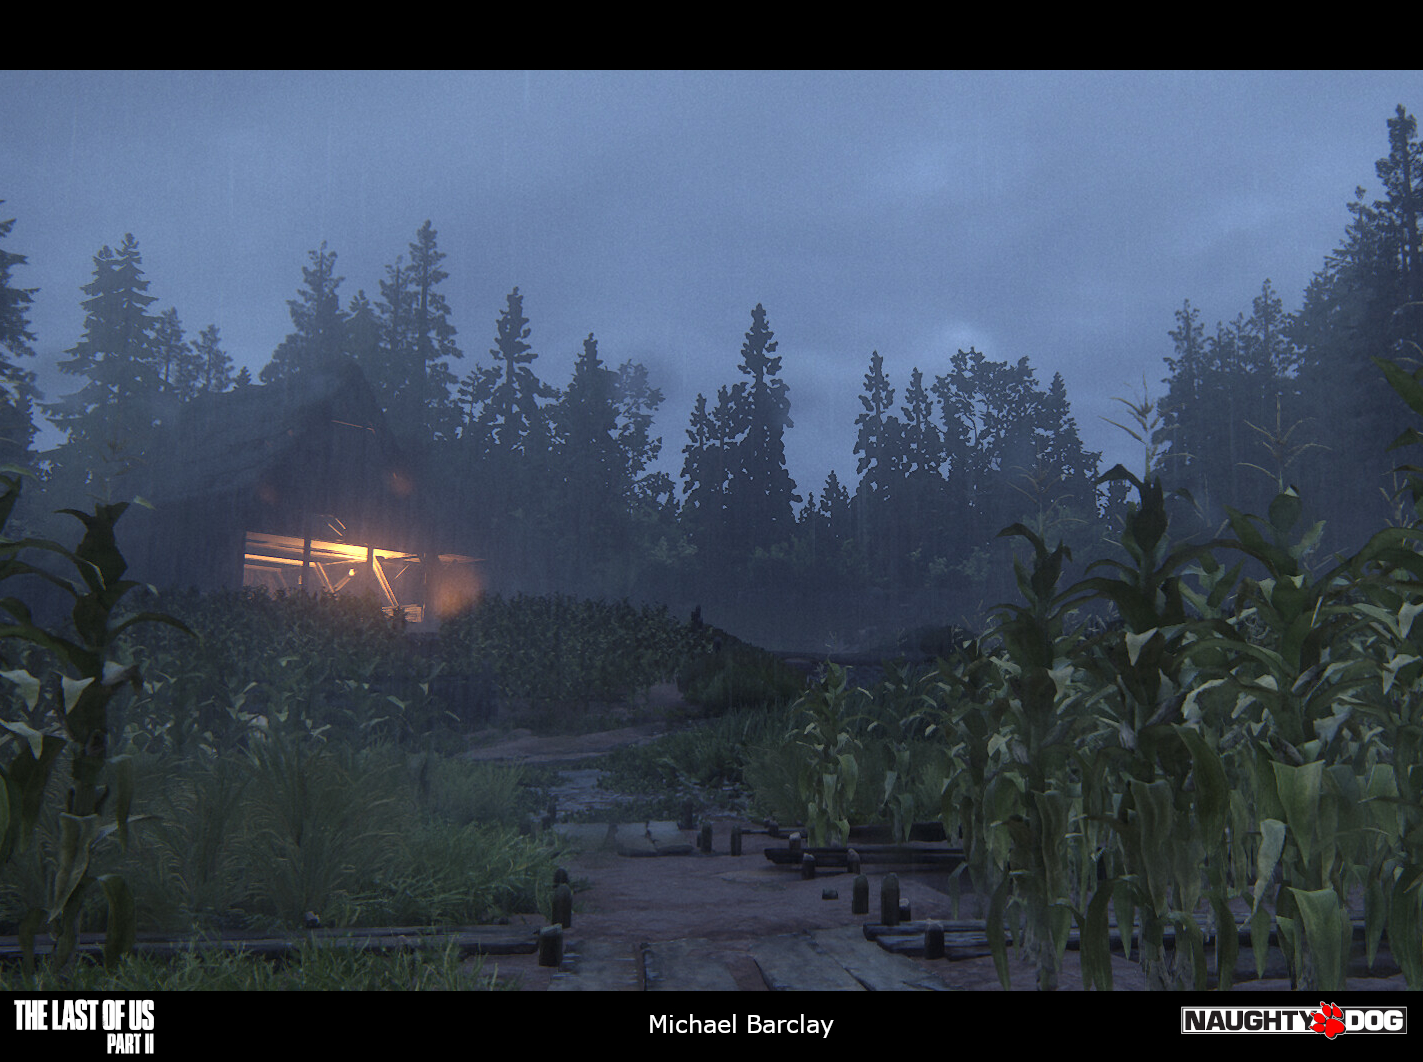
One such encounter was known internally as “farmland”. I loved the idea of encountering Scars in a huge field of corn. A very simple layout with hardly any standard metrics for combat. I really enjoy breaking rules in layout where possible and trying new things, for The Last of Us an encounter where your main defense is vegetation was definitely unique. By swapping out hard cover for soft cover (a word we use for the practical use of vegetation in combat) across most of the space, it also helps to encourage a non-lethal or stealth style of gameplay. We still allow players who cannot help themselves but get into a fight to escape and reset combat, so it accommodates multiple styles of play.

This is also one of the only places in the game that Seattle’s famous Space Needle is visible. I loved the idea that something so iconic could be lost in the forest of a new world where no one pays it much mind.

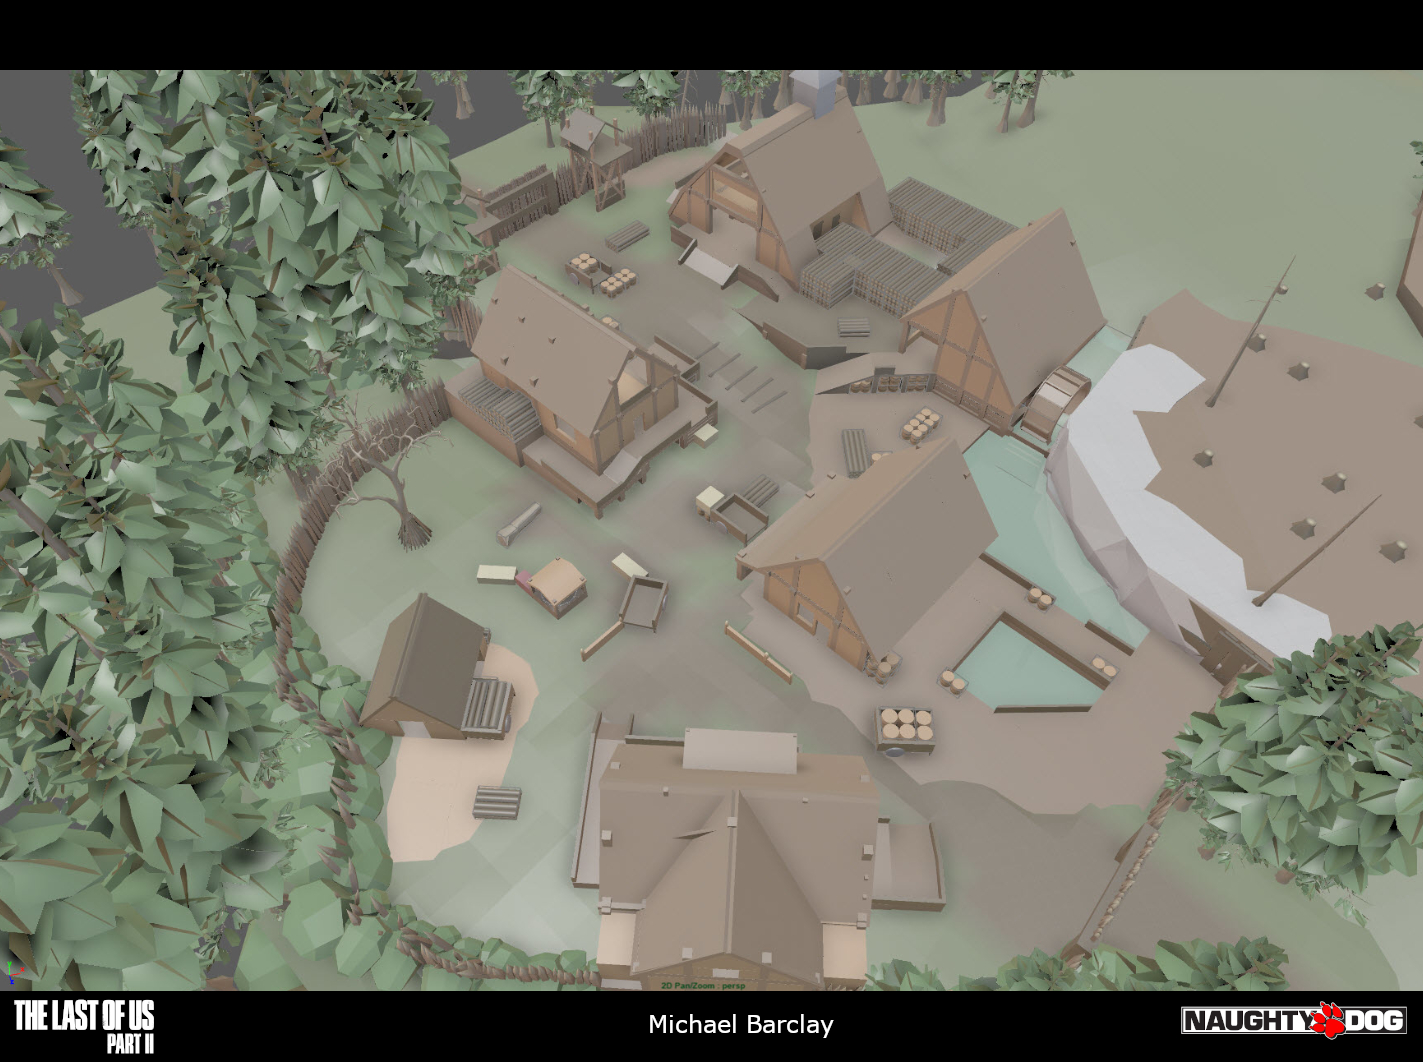
I was lucky to get to design Scar Island as a whole, from the moment Abby and Yara land on the shore to the point Abby and Lev boat away, and so I was able to personally oversee the level’s pacing in a way that we don’t always get to in levels that are bookended so closely by other spaces. To take advantage of this, I wanted to build Scar Island as seamlessly as possible. Since it was just me working on the space for so long, I’d be able to build a cohesive path through the island with no player-teleporting or fudging of spaces (which we often do in levels to keep landmarks visible or transition to new locations). The locations of all the important landmarks remain consistent throughout the level and I think it pays off by making the location and your journey through it feel more tangible.

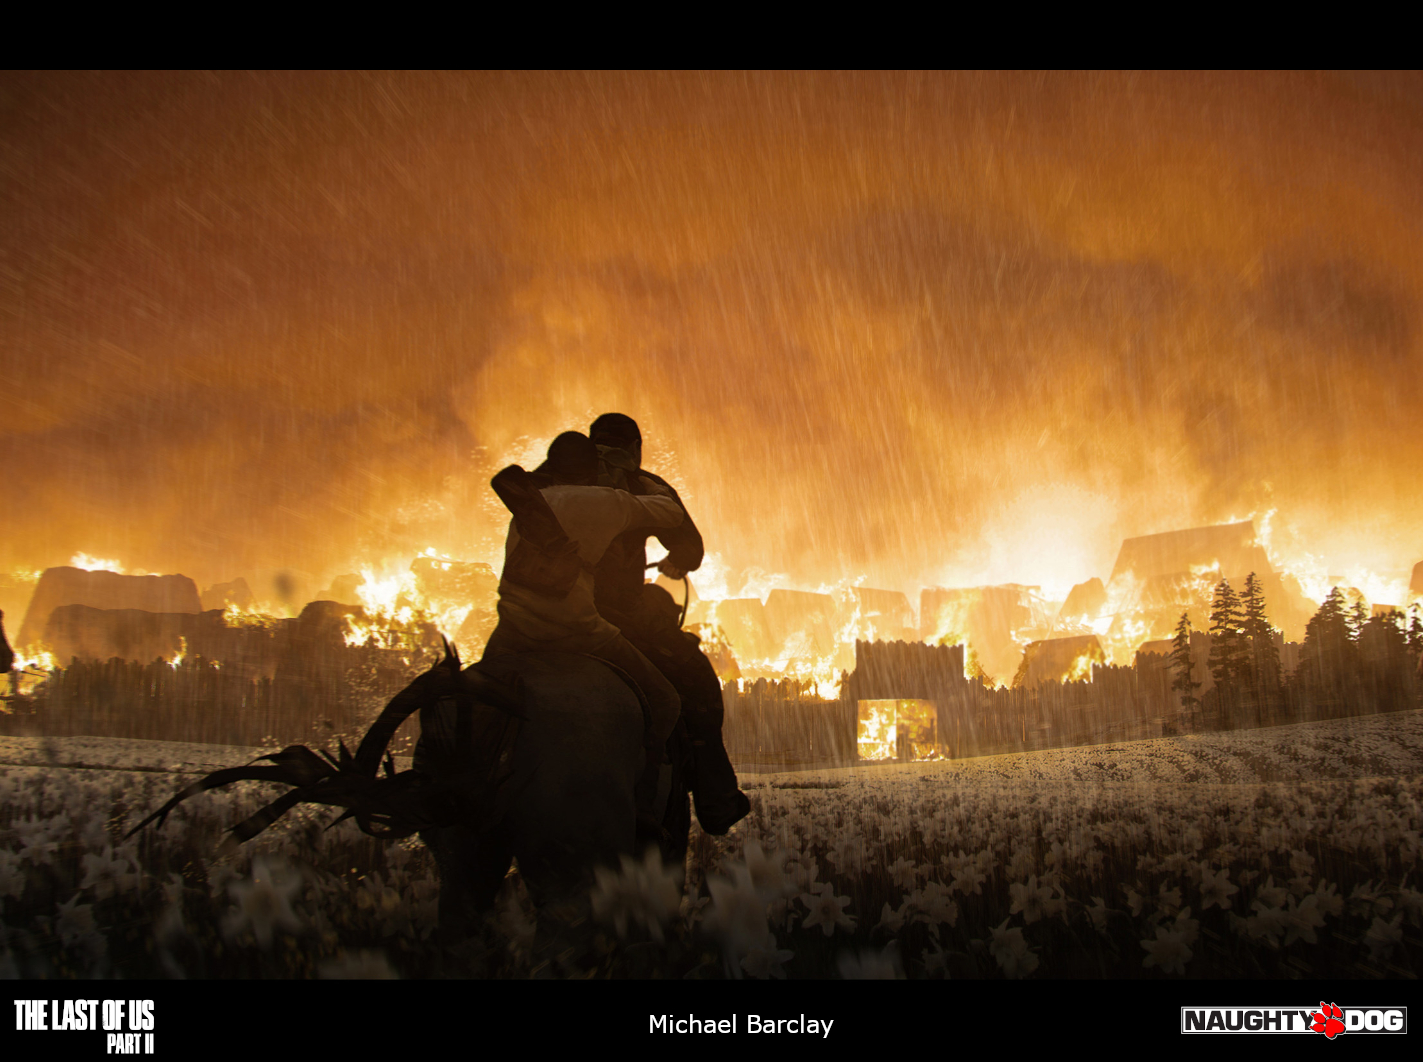
The beats I was given for this level were “Abby and Yara go to Scar Island to locate Lev”, “Abby meets WLF”, “WLF kill Yara”, “Abby and Lev escape the island”. We knew that the initial experience of the level would focus on stealth and infiltration as Abby and Yara search for Lev. Once Lev has been located however I pitched several beats to the team that ramped up momentum towards the final escape such as a horse chase and sneaking through a logging camp.

We knew the back half of the level would have mixed combat encounters with both WLF and Scar factions fighting one another as WLF invade the island. There was a great opportunity here to show how Abby is primarily concerned for Lev’s safety and, again, combat is not something that needs to be entered until it’s absolutely necessary. I wanted to build spaces as wide as possible with very little verticality for this final escape. Emilia Schatz, who was co-lead designer for TLOUII, had prototyped a few spaces that we felt could work to that end. We took one of Emilia’s early layout prototypes as a basis for the encounter where Abby and Lev steal a horse while WLF and Scars battle one another. Once I added the space to the level I continued to modify and iterate on it with our amazing art and design teams until it became the version you see in the shipped game.

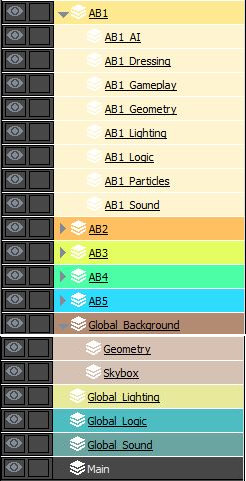
This process is becoming more common in AAA development and is sometimes known as “action blocking”. During pre-production a design team can produce dozens and dozens of prototype spaces in isolation. Some might already work with a level in mind, most however will teach us something about the game and will be thrown away. We had a bank of these encounter spaces that we often re-evaluated throughout production. If a level required a specific beat, we could save time and work by taking one of these “action block” spaces and re-purposing it. I recommend watching Respawn Entertainment’s Christopher Dionne discussing this process at GDC here.

I continued to pilfer our bank of action blocks when we needed an encounter space for Abby to face off against the WLF. Arnaldo Licea had a great space that showed a lot of potential in early prototyping. We took it as a basis for the new encounter space in Scar Island and worked with the concept and environment team to turn it into the brewery!

One of the biggest pitches I made to the team was to add a horse chase into the level. To me this allowed for a few benefits:

  1. I could frame Haven as very far away right at the start of the level and never have to cheat its position or teleport the player closer in order to preserve pacing since the horse would allow us to close loads of ground at the end in order to reach the capital.
  2. The horse chase would better sell the narrative and feeling of escaping and rushing towards a goal.
  3. The momentum of this set piece meant we were really ramping up the stakes as the level moved on.

I was lucky to get to work with Connor Brown, another game designer, on this setpiece as he came on to take over layout of this section part way through development while Karl Morley took on scripting duties. The final experience that Connor and Karl produced was one of our most iterated set pieces as there were multiple paths and beats to time out and everything had to be as fun as possible before passing off this really tricky space to environment art and effects.

There were many significant challenges for this level and one of the largest was to pull off the amazing VFX you see near the end in the burning city. From the onset of production we knew the finale, the fight through the Seraphite capital “Haven”, would be set against a visual of raging fire as the WLF torch Scar buildings. To remind myself of this I added blockmesh fire to the level (to the amusement of the VFX team) but it was a good reminder that for most of this space, again, we were breaking rules and setting our regular level design shapes literally on fire. This means that cover and boundaries behaved differently here and it took a huge effort to get this playing right.

Overall Scar Island was one of the most enjoyable locations I got to design for The Last of Us Part II and I’ve been overwhelmed at the response it got from players. Hope any level designers out there also find something useful from the details of how it was designed.

Cheers!

Blocktober 2020

The Last of Us Part II, Downtown Seattle

See the difference between blockmesh on the left and final art on the right.

For 2020 I wanted to use #Blocktober to go into the creation process of a professionally made level in a bit more detail. When Blocktober kicked off in 2017, I asked people to share screenshots of their level blockouts, which were rarely seen outside of game studios despite being a fundamental part of the level design process. What’s difficult to discern from a screenshot however is the iterative process that goes into a level’s design in order to give it that quality that differentiates it most from simply being a piece of environment art: interactivity.

My experience as a level designer on The Last of Us Part II was pretty incredible and represented, for me, the culmination of over a decades worth of experience in level design. After completing my work on Uncharted: The Lost Legacy I had shipped a couple of levels already at Naughty Dog and was up to speed with the technology and team dynamics. I felt pretty comfortable about being able to produce good work, but I wanted to find ways to push myself as a designer and further develop level design concepts that I’ve been formulating since the start of my career. I was lucky to work on several long stretches of the game and I wanted to explore a different challenge and paradigm for each as much as I could within the brief given to me by the directors and the games overarching design philosophies.

I was also able to develop each level I worked on with a liberating level of autonomy, as far as level design is concerned. The infected “hive” in Abby Day 2: The Descent, for example, was something I introduced when exploring ways to get the player back down to ground level from the crane bridge they had just crossed.

Above: Blockout of the Infected Descent from Abby Day 2 in The Last of Us Part II

On The Last of Us Part II I was responsible for designing the following levels:

  • Ellie Day 1: Downtown
  • Abby Day 2: The Shortcut
  • Abby Day 2: The Descent
  • Abby Day 3: The Island
  • Abby Day 3: The Escape

Ellie Day 1: Downtown was probably the biggest single level I had the privilege of designing, so I’ve decided that it would be the best one to kick off my #Blocktober 2020 with!

I’ve put a full list of the developers that worked directly on the level below, but the co-owner of Seattle Downtown in the design department was Mark Burroughs who did the scripting on the level and who was a massive reason the level turned out so well (at least, in my opinion it did!).

Ellie Day 1: Downtown

Every level we worked on for TLOUII began with a simple brief. Some were simpler than others, and in the case of Downtown the brief was “Following the trail of Tommy then discovering the murdered WLF soldiers”. We had already explored the downtown area of Seattle in early level prototypes but we needed a larger space to accomplish some high level goals we also wanted to achieve.

Downtown: High Level Goals

  • Theme: I wanted to deliver on the most realized version of the fantasy of having an empty city to explore. Since this is a driving factor of a lot of post-apocalyptic media, I wanted to nail as much as possible that feeling of melancholy mixed with excitement and mystery that you feel at the start of something like 28 Days Later. I also wanted to bring on a little personal experience of growing up in Scotland and poking around in ruins or abandoned places in the wilderness that was right on my doorstep.
  • Traversal: Our early prototypes of levels on horseback were linear and while these are effective for urgency and giving the sense of traveling large distances, I thought there was room to explore different ways to capitalize on this form of traversal. There’s a sense of freedom in being able to traverse on horseback, so I wanted to develop a level that honored that, inspired by games like Shadow of the Colossus and The Legend of Zelda: Breath of the Wild. We thought it was important to have a large space that warranted multiple revisits and criss-crossing where the player would need to rely on the horse to travel quickly, but also felt fun to ride through.
  • Pacing: At this point in the story, while the characters are reeling from a catastrophic event, we are still early in the journey. I wanted to offer the player a space to reflect in, a place to take things at their own speed and enjoy unraveling some light narrative threads. This also offered a chance to be introduced to Seattle, it’s history in our fiction as a Quarantine Zone as well as an opportunity to get to know the character Dina a little better. I wanted to achieve this by giving players the freedom to approach objectives at a pace dictated largely by themselves.
  • Objectives: Agency in objective order was important to make the player feel like they had more authorship over their experience. Autonomy in this way contributes to the sense of freedom we were going for, it also helps build more substantial payoffs to mystery in the environment. For example, a player who explores the far reaches of the map and then actually uncovers some major plot point or goal will be more engaged with the principles of exploration as the discovery feels more natural, as though they stumbled onto it purely of their own volition. I didn’t want players to be restricted to a linear route through the level and I strived to maintain the multiple choice objectives for that reason. I also wanted the outside space or “overworld” to feel just as full of content as the interior “dungeons” that housed some of the objectives, instead of just being a place to ride through on your way to another sectioned off space.

Gathering Reference

Above: Google maps view of Seattle

When dealing with a level set in a real world location the first thing I do is jump into Google maps (other map based services are available) and fly around checking out the location.

First Blockout

As I mentioned we had done some explorations of downtown already as a playable space. Mark Davies, a fellow designer at Naughty Dog, had put together the freeway that runs parallel to downtown and once we decided to expand into more of the built up area I inherited the freeway space from him. From there I started to build several of the blocks that surround the freeway.

I didn’t really try too hard to stick to the actual layout of downtown Seattle at first. At one point all the buildings were scattered away from their original locations. Through a series of iterations, I found out that I was actually only a couple of changes away from matching the real world layout exactly, so I made some changes and we shipped with something very close. We also managed to maintain the ordering of the street names (Jefferson, James, Cherry, Columbia, Marion, Madison, Spring, Seneca, University, Union, Pike, Pine) which, I was informed by Seattleites, is extremely important.

Above: An early birds eye view of Seattle Downtown

When I composed the skyline of the space originally, I noticed that the main discrepancy between what I had in game and the layout of buildings in the real world was a building called The Mark, which is a skyscraper that I hadn’t placed in my level. I’d not planned to build another skyscraper in the level, so I was willing to just go with the design that worked instead of matching the real world. However, I remembered Google has a time machine built in to its maps feature and checked out the space as it was in 2013, on Outbreak Day in our fiction, and the skyscraper wasn’t there! Perfect.

2013 on the left, 2019 on the right

I even used the real world reference of it’s construction site in 2013 to inspire an infected combat area.

Above: Construction site inspired by Googles time machine!

Initially a lot of the exploration into the space focused around how to execute on the high level goals we’d established. I put a lot of time into investigating the boundaries of the space we’d require and the shapes that we’d want to focus on to drive exploration. Since we knew this was a level where you’d be riding on horseback, I laid out a space that I used to test the traversal and get some good metrics for spacing out obstacles.

Above: Trying out different shapes for the points of interest in the level.

At the early stages of level design we try not to go into too much detail, as you’re just as likely to completely cut a piece of geo as you are to keep it. I follow the mantra of fail early, fail often when it comes to design and so I keep my shapes as simple as possible early on.

As I was also working on levels that took place in other locations in Seattle, I was able to ensure the player had line of sight to other parts of the game. Not many people notice this but you can actually see the “shortcut” crane bridge that Abby crosses right at the start of the game from this location!

Blockout Iterations

The point of entry into the large open section of the level was intended to provide a feeling of vast openness that invited you in. I wanted it to feel like a postcard version of Seattle as it appears in the world of The Last of Us. From this position your main objective locations are all visible, even though you’re not aware of what those are yet. This was a big “Welcome to Seattle” moment.

To help pay off this vista reveal, I contrasted it with a tight trek around a claustrophobic winding bit of forest before the player steps out into the open fields of downtown.

The key objective locations changed a lot throughout production as we iterated, made changes to narrative flow and playtested. As players found their way through the space or, as was more common early on, got lost, we would shift pieces of the level around and make adjustments often. The total number of iterations made to a level this size would be in the hundreds, if not thousands, and the end result that you see in game is drastically different to the early drafts of the space.

We always made sure to maintain that initial view. I moved the domed building (a synagogue) closer into view as I found it really helped the flow of exploration. It was the most commonly visited first location statistically and I used that to gently push players into discovering secondary locations such as the ruins traversal puzzle and guitar store by placing them between the start position and the synagogue. The way the curved dome stands out amongst the square skyscrapers makes it feel inviting and goes a ways to adding to the buildings somewhat peaceful interior experience, so to make sure you could always see it I created a field in front of it.

Points of Interest

I wanted the outdoors space to be as much of a playable part of the level as the “dungeons” you went in to. As I said previously it was important to me that the open space between dungeons wasn’t something you just rode through on your way to your next objective. To that end we added content like small puzzles, hidden areas and mysteries to discover at multiple points of the level. These helped keep the level feeling persistent and added a level of ambiguity between where content could be found. This helped keep a broad weight of interest between points of interest and players were more frequently spending time in the outdoors exploring as well as jumping in to the interior dungeons.

Spacing between these points of interest was important. As we were iterating on the space we had to make sure the map was evenly populated with things to do, to reduce any sense of “dead” areas. Sometimes a specific location was a great fit for a piece of content and other times we had to shift whole buildings to maintain this spread.

Narrative Layers

One major consideration that all levels face in The Last of Us is the ability for players to piece together the history of a space just by observing its visible attributes. With downtown, we had to layer up the histories of Seattle from Outbreak Day to the day Ellie arrives.

We started by building a timeline for the level. With the city in 2013 as its base, we had to consider the events that occurred on Outbreak Day, then the collapse of society as we would have known it, the establishing of the quarantine zone, the eventual collapse of that quarantine zone and finally the influence of the Infected and WLF (the faction that presently inhabits the space as you arrive).

We utilized these multiple layers of history to create pieces of environmental narrative and storytelling that would broaden the sense of place within the level and make it feel more tangible to the player. The player could also read the environment to learn more about Seattle and its history.

While we often build to the requirements of narrative, this is not always the case. In the example of the collapsed building above, I liked the idea and the imagery that a fallen building could evoke in the level. Once I had the layout set the way I liked, we would have a concept artist do a paintover on top of the layout to establish the idea before an environment artist came on to develop it.

Above: Concept paintover of the fallen building by Robby Johnson

Breadcrumbs

The final element of this level’s design that I want to touch on is how we used open ended exploration and rewards to guide players through the space.

I was a big fan of the games Sherlock Holmes Consulting Detective and Her Story before starting this level’s design and I was excited about the prospect of letting players gather pieces of narrative information out of order that, when studied, would reveal some interesting thread or story. To guide players between these pieces, we made sure that each held information about where the next new piece of information may be found. We also placed them in key locations the player was sure to travel. For example, in the synagogue, which is a critical location, the player will find a note leading them to an abandoned safe house. There they can find another “breadcrumb” of evidence that would lead them to a hidden stash in Barko’s. These items can be found in any order at any time by the player, which also has the added benefit of eventually injecting them back onto the critical path, preventing them from getting too lost.

These breadcrumbs also tell multiple stories, such as the story of how the WLF overthrew the FEDRA forces within Seattle, giving them more than just a mechanical reward but a narrative one too.

There were several of these threads for players to discover, and they were all trackable via the player’s map which was also a unique mechanic for this level. They all added to the high level goal for our objectives which was to keep the open spaces as interesting as the interior dungeons the player would step into.

I was incredibly lucky to have had such an amazing team to work with who made all this content possible and who I am privileged to be able to work alongside at Naughty Dog.

To give you an idea of how many dogs had to come together for this level, below is a list of most of the developers that worked on the level directly.

  • Emilia Schatz – Design
  • Mark Burroughs – Design/Scripting
  • Andrew Frost – Design/Scripting
  • Mark Davies – Design
  • Todd Foster – Environment
  • Chad Russ- Environment
  • Jon Schmidt- Environment
  • Jose Vega- Environment
  • Santiago Gutierrez- Environment
  • Philip Weisfeld- Environment
  • Reuben Shah- Environment
  • Antoine Deschamps – Lighting
  • James Guard – Lighting
  • Wendy Pham – Lighting
  • Mari Kuwayama – Lighting
  • Michael Fadollone – Props
  • Charlotte Francis – Props
  • Jane Mullaney – Props
  • Sylvia Chambers – Animation
  • Aaron Juntunen – Animation
  • Laura Swartz – Animation
  • Michal Mach – Animation
  • Sabrina Phillips – Cinematics
  • Beau Jimenez – Audio
  • Neil Uchitel – Audio
  • Josh Scherr- Narrative
  • Emily Scrivner – Narrative
  • Wataru Ikeda – FX
  • Mark Mayfield – QA
  • Ashleigh Dale – QA
  • Wadah AlHasen – QA
  • Maxence Gomez – QA
  • Sam Schoenfeld – QA

Not to mention the other leads, directors and producers that oversaw development!

I haven’t touched on the actual interior spaces themselves in this blog such as the bank, the synagogue, the infected courthouse or the guitar store where Ellie plays “Take On Me”. While I would love to keep going into detail about all the areas of the level I haven’t covered yet, I need to keep something for my next Blocktober blog!

Cheers

Mike’s Dry and Boring CryEngine Technical Level Setup Document

Not a very exciting blog this time. When working on games in CryEngine (or other similar engines) it might be useful to lay out some standards for level entities and scripts. This is based on years of experience working in CryEngine, but is probably woefully out of date by now.

Hopefully you find it useful, even just to see how professional levels are organized!

Layers

Levels are split up into sections known as “Action Bubbles”.

  • An action bubble is an area within the map that has clearly defined boundaries.

Areas that connect action bubbles are “Transitions”.

  • These can also sometimes be referred to as “Gates” or “Valves” and have technical considerations for the loading/streaming of action bubbles.

Any assets that are not specific to an Action Bubble are placed on a “Global” layer.

  • Global layers contain level-wide assets such as skyboxes, ambient sounds or global logic.

Layer Naming and Categories

  • ABX = The parent of all the layers that make up an Action Bubble (AB).
    • ABX_AI – All AI related assets are placed within this layer. This includes actors, AI vehicles, waves entities, territory entities, tag points involved in pathing, navmesh markup, smart objects and any areas or triggers related to AI setup.
    • ABX_Dressing – Art layer. All objects used to dress the action bubble are placed here. Physics objects, decals, small objects etc
    • ABX_Gameplay – All assets that the player can interact with inside the action bubble should be placed in this layer. Player vehicles, switches, triggers, interactive doors, items, pickups, collectibles, ammo etc
    • ABX_Geometry – All static geometry that relates to this action bubble is placed in this layer. Brushes, geom entities, large physics objects etc. This is primarily an “Art” layer.
    • ABX_Lighting – All lighting related assets placed here. Lights, environment probes, physics objects with lights attached etc
    • ABX_Logic – Contains the Flowgraph Containers used to script the level. Can be used to store debug assets during level creation.
    • ABX_Particles – Contains all particles used in the action bubble.
    • ABX_Sound – Contains all the sound information for the action bubble.
  • Global_Background = The parent layer for all the background assets in the level
    • Geometry – Any objects that make up the background scene go here.
    • Skybox – If the skybox is made up of more assets than the environment tab (e.g. hand placed nebula) these assets go here.
    • Developers can add any additional layers here that are requires for the background of the level that need to be split out.
  • Global_Lighting = All global lighting assets are placed here.
  • Global_Logic = Flowgraph containers and logic (triggers etc) that are used for the whole level go here.
  • Global_Sound = Any level-wide sounds go here. E.g. Ambient tracks, ambient sound effects for outdoors etc.

Layer Properties

  • Most layers require specific settings to comply with the standard working practises of CryEngine.

  • Visible – Does the same thing as the layer hide/show icon.
  • External – This is what generates the .lyr allowing for each layer to be tracked by version control individually. Without this checked, the layer still exists but only as part of the cry file. It is standard practise that ALL layers are external to allow for multiple designers to work on a single level.
  • Export To Game – Required if the layer should be exported. Examples of layers that shouldn’t be exported are: Debug layers, layers that contain concept art references, temporary geometry layers.
  • Brushes Have Physics – Brushes within a layer with this disabled will not have physics. This is good for distance background objects to save on performance.

Logic

Flowgraph Containers

  • All scripting for the level is contained in Flowgraph Containers. While any entity can contain flowgraph, it is standard working practise to ONLY use the FlowgraphEntity as a container to write flowgraph in.

  • It is good working practise to place all flowgraph containers at a point of the map that is easy to remember for good organisation.


 Flowgraph Container Naming and Categories

  • Remember: Containers are placed within the Logic Layer for their respective action bubble (or the global logic layer for the global flowgraph containers).
  • Each container is prefixed with a corresponding number [Action Bubble][Type]. This allows us to order each action bubble folder in the same manner.
  • ABX_Logic = The parent folder for all Flograph Containers for a specific action bubble.
    • X0_DEBUG_FG – All debug logic for this action bubble is written in this container. This includes logic to “skip” parts of the level logic for testing, as well as any functions to enable god mode, spawn weapons or vehicles or anything else the designer needs to debug their level.
    • X1_Gameplay_FG – All gameplay logic for this action bubble goes in here. Gameplay logic is any player related script. (E.g. player triggers, health, ammo, weapons, unlocks etc).
    • X2_AI_FG – All AI related flowgraph goes in here.
    • X3_Objectives_FG – All mission objective related flowgraph goes here. This is solely the logic required for the player to accomplish. The actual mission objective nodes will be covered later.
    • X4_Dialogue_FG – All dialogue scripting goes in here. This includes cooperative AI conversations or player choice conversations.
    • X5_Cinematics_FG – All cinematic related logic goes here. E.g. Trackview triggers, animation nodes, cinematic player controllers.
  • Global_Logic = The parent folder for all global flowgraph logic. As well as per action bubble logic, we will require global tracking data for the entire level that is not explusive to a single event or area.
    • Global_Debug_Logic_FG – Any debug logic that the designer wants to access for the entire duration of the level. E.g. “God mode”, “beam to location”, “toggle gravity”.
    • Global_Gameplay_Logic – Player related data that you want to track for the whole level goes here. E.g. “Player At” systems are a way to detect where the player is in the level, which is useful for optimisation or streaming.
    • Global_Objectives_Logic_FG – This is where the actual MissionObjective data is tracked. It is useful to contain all the actual objectives in a single container to more easily visualise the mission objectives.
    • The conditions which actually trigger the objectives are still contained on a per-action bubble basis within the X3_Objectives_FG container.

Flowgraph Standards

Flowgraph Layout

  • Flowgraph pages are massive! Due to this fact, there is no reason to squash your flowgraph together. Spreading out your flowgraph nodes makes it easier to read and debug (during debugging, flownodes will grow in size as variables are printed in them, which occasionally leads to overlapping).

  • Make sure nodes are spread out and use comments as often as possible.
    • Tip: Good comments explain WHY you are doing something, not WHAT. An observer can already see WHAT is being done by reading the flowgraph, but the WHY may be ambiguous.
  • Always use comment boxes to organise your scripting and make it easier to read.
  • The “fill” option that is on by default just makes flowgraph harder to read. It is best to turn this off unless you have deprecated flowgraph (see below).
    • Try and colour code your comment boxes to make them easier to navigate.
    • g.
      • Orange – Debug
      • White – Standard
      • Red – Hack
      • Blue – Prototype
      • Purple – Dialogue
      • Grey + Filled – Deprecated but not deleted

Game Tokens

Game Tokens allow designers to store variables and pass them between containers. They are incredibly powerful tools that make scripting cleaner and optimised when used correctly.

Guidelines For Usage

GameTokens should be used to optimise scripts and pass variables between containers. They can be used to store “states” that designers may need to reference throughout the level such as objectives, conversation choices or pickups the player has found.

The strongest example of GameToken usage is found in the objectives system. By setting a gametoken to “true” each time an objective is complete, we can then use those same gametokens in all of our containers to trigger new logic.

Naming


  • GameTokens can get confusing and mixed up quickly, so it is important to clearly label your tokens and organise them.
  • TurnedOn = true/false (Boolean)
  • [Action Bubble]_[Purpose].[State] = true
    • In this example we can see what the gametoken is being used for based on its convention. It stores the “state” of a switch that controls gravity in the level. The switch is located in the first action bubble, AB1.
  • Gametokens are similar to flowgraph containers in that they should be organised between action bubbles, or in the global variables list.
  • Gametokens can be created in the single level library OR we can create new libraries. It is sometimes cleaner to create a new library for each action bubble instead of piling all your gametokens in a single library (“Level”).

Objectives

Each mission in the campaign will provide a number of objectives for the player.

Setting these up requires a MissionObjective entity to be placed at the destination of the objective. This also acts as the in-world marker position for the HUD icon.

Naming

  • MissionObjective entities are frequent throughout the level, and must be named properly so they are easy to manage.
    • AB1_GetToTheChopper_MissionObjective
      • This tells the developer that the mission objective “Get To The Chopper” is in action bubble 1.
      • It may seem easier to NUMBER mission objectives, however this is not good for iterative design. When you need to add a new objective in between Mission 1 and Mission 2, you throw off your whole system For that reason, using unique names is better, and more explanatory.

Debug

Tags

Tags are created in the level by pressing CTRL+F1/2/3/…

This stores a coordinate in the tags.xml file attached to the level.

You can press SHIFT+ the corresponding F key to jump to that coordinate at any time in the editor.

Per-Level Debug Script

It will be necessary for every level to have a fast debug jump through the level.

This must be set up by the designer so that pressing F2 (spawn) will jump the player character to the next objective and cleanly complete all the previous logic. Since the logic for each level is unique, it will be down to the designer to set this up on a per-level basis.

Blogtober

Blocktober

I thought it was finally time to write up a quick blog post summarizing the amazing response #Blocktober received last October. Hopefully this also serves as a nice way to remind people to start collecting up stuff they want to share this year!

We got some awesome coverage of the work on display from news sites and it spawned a lot of discussion on level design forums like MapCore.

Gamasutra

“Ever wondered how level designers plan out vast, sweeping levels without getting lost in a labyrinth of their own making? Well, thanks to the Blocktober hashtag, all your dreams are about to come true. “

Polygon

“This is a stage of development we’re not often able to see”

Gamesradar

“Naughty Dog starts #blocktober by showing off Uncharted’s bones, more devs join in”

Mashable

“Game developers on Twitter are sharing what their games looked like mid-development”

Waypoint

“Game Designers Are Sharing Naked, Unfinished Levels for “Blocktober””

80.lv

“Level Designers Reveal Early Stages in “Blocktober” Hashtag”

Our own David Shaver even took Blocktober to GDC this year…

Personally, I loved seeing everyones work whether it was professional or personal, recent or past, veteran or hobbyist. It was all really inspiring and I hope the exposure helped everyone improve their skills and maybe grow a bit more appreciation for the art of level design.

After talking with many developers it seemed that getting exposure on the working practices of level designers was hard to come by. There is such a broad spectrum of what is considered “level design” and every studio has a different way of operating, but if Blocktober showed me anything it’s that the core fundamentals of what is expected from level designers seems to be consistent.

That being, that while blockouts form much of the basis of our output, level designers are also expected to be the glue between all departments in a studio (if you’re a one person team you are also the glue between you and…you). Someone recently described level designers to me as the stewards of the game. When you own a level, no matter how it is represented, you don’t just own the geometry but you have to consider every single element that goes into it. While Blocktober was able to showcase the enormous talent of level designers and their ability to create spaces, the elements we see in screenshots only show a small portion of the discipline. This is why I think it’s so important to gain visibility on work that isn’t just of artistic merit, but also displays clear intent and function for a huge range of games. The level of skill on display in the work people shared with this daft wee hashtag was phenomenal and they showed that it takes a great amount of experience to be able to focus on the elements that are truly important to your game while also creating spaces that covey your intent.

This is also why I enjoyed seeing blockouts for past works. I know there was some expectation that people should tackle #Blocktober like #Inktober (by attempting a blockout a day (I tried myself, it’s tough!)) but I think what we gained from seeing blockouts of works we have experience playing is of enormous value. As I said, the artistic side of blockouts is only a small part of the whole picture and so being able to see early blockouts for games like DmC, Gears of War 4, Titanfall, Deepest Ocean, Q.U.B.E. 2 and everything in between, knowing how they feel to play, is a fantastic source of knowledge.

I do want to give a shout out to Jasper Oprel (@jasperoprel) for actually completing one blockout a day and then combining all that work into a dungeon you can explore here…http://oprel.work/games/templo/

The response to Blocktober was immense and I’ve had the enormous privilege of seeing level designers light up when discussing it and looking forward to it continuing. Thanks to everyone who contributed and made that possible, it’s truly amazing and I hope people engage with it again this year.

Originally I was going to do a “my favourite posts” blog, but I think there were too many to be able to do that. So instead I’ll just sign off by saying remember to follow @BlocktoberLD for all the #Blocktober tagged goods and get prepping for October 2018!

Cheers.

#Blocktober

Much like community initiatives like #Inktober the goal is to improve your skills and share images of your level blockouts. This is a stage of level design that few people get to see and it would be great to get more people aware of what goes in to level building, warts and all!

I’ll be archiving as many #Blocktober tweets as I can at https://twitter.com/BlocktoberLD

Share images of your blockouts with #Blocktober

Cheers,

– Mike

GDC Europe 2016

fb

Unfortunately I managed to completely miss posting any content in July, but for a very good reason. I have been busy putting together my talk for this years GDC event in Cologne!

I will be giving a talk titled: Creating Conflict: Combat Design for AAA Action Games along with two very talented designers: Pete Ellis from Guerrilla Games and Sam Howels from Deep Silver’s Dambusters Studios.

You can catch the talk at 2:30pm on Monday the 15th of August at the GDC event (or later on the vault).

Hopefully I’ll have more content for the blog soon!

Cheers

Creating Conflict: Combat Design for AAA Action Games

Michael Barclay  |  Lead Level Designer, Cloud Imperium Games | Speaker
Sam Howels  |  Principal Designer, Deep Silver Dambuster Studios | Speaker
Pete Ellis  |  Level Designer, Guerrilla Cambridge | Speaker
Location:  Congress Saal 2, 4th Level
Date:  Monday, August 15
Time:  14:30 – 15:30
Format: Lecture
Track: Design
Pass Type: All Access Pass, Student Pass Get your pass now!
Vault Recording: Video
Audience Level: All

Back to The Witcher

I finally have managed to find the appropriate amount of time to get stuck in to The Witcher 3.

header

While I have managed to rattle through Dragon Age: Inquisition, clocking in an obscene amount of hours, I found I couldn’t get any momentum with The Witcher. With RPGs of such immensity, when you don’t get any flow you will put it down one afternoon and not revisit it for weeks.

I bought in early but found its control scheme wasn’t to my liking. It reminded me of trying to navigate through doors in Red Dead Redemption, clunky and unresponsive. I don’t have some kind of deep rooted aversion to floaty controls but I found it quite frustrating.

I also found I would constantly snag on the (albeit beautiful) scenery and watch Geralt start-stop-start-stop before getting a run on again. This was particularly bad while riding his horse (Roach).

I’d heard a patch introduced a new control scheme and tried again. Using mouse and keyboard I still found it a bit of a chore to control, but then I switched entirely to gamepad.

Now I’m in.

kxnz8yzofzcd4abeeqma

I’m thoroughly enjoying the design of the overworld. I am a “Hooverer” in RPGS, by which I mean I try and hoover all content in an area before moving on to the next. Something I loved in Skyrim was the gentle encouragement to stray from the critical path by small quests, distant landmarks and the sound of dragons. The world of The Witcher is so beautifully crafted that i am finding it just as exciting to wander off to side-quests and events as it is to complete the expertly written story missions.

This helps give rise to the best kind of game stories. Just as you are fulfilling the main objectives laid out by the game, an intriguing event pulls you off to one side. “I’ll just check this out then get back to it” you think. Suddenly, hours later, you’ve gone off on a completely separate adventure that seems to have sprouted organically amoungst the scripted paths the developers laid out.

Looking forward to more.

Also, I’ve been complimenting my dive into The Witcher with a great fantasy novel I highly recommend: Patrick Rothfuss’ The Kingkiller Chronicle: The Name of the Wind.

Pillars of Creation: My Level Design Process

Too "blue", throw it out, start again.

Too “blue”, throw it out, start again.

My level creation process is something that is constantly being adapted and tweaked. I wanted to jot down the process I tend to use when building a new level from scratch, and this process is usually the same if it’s in a professional or personal pursuit. For the purposes of this blog, I’ll be using an example of a single player environment in a story driven action game. A few things change between third and first person, but not so much as the below process needs to be completely reconsidered.

1. The Concept

Without some kind of boundaries and guidelines I’d probably spend forever rebuilding a space. Like a blank piece of paper ready to be drawn on, a new level has infinite possibilities to start with. We need to know a few things:

  • Location
    • Where is the level set?
      • E.g. A comms station in the Franklin Mountains, El Paso, Texas.
  • Premise/Theme
    • Otherwise known as the “razor”. What is this level all about?
      • E.g. “Broadcasting an SOS using an old comms tower.”
  • Major Goals
    • What are the players primary objectives and goals?
      • E.g. Reach the comms tower and start the signal.
  • Affects Gameplay
    • How does the theme affect the gameplay? Is it a chaotic level or quiet? What’s the expected tempo?
      • E.g. Urgent dash to the comms tower battling heavy resistance.
  • Mechanics Introduction [If required
    • What mechanics are introduced to the player in this level?
  • Exotic Gameplay [If required
    • What non-standard gameplay sections are included in this level?
      • E.g. Battling an enemy chopper at the top of the mountain.

We can do more with less sometimes, and we don’t want to be too prescribed early on but the above list is something that should take the smallest amount of time (usually most of it is already handed down by a senior team of directors, writers and designers).

Another caveat, hopefully you’re doing this with an already banked “vertical slice” or core experience ready. It can be incredibly difficult to develop a level while you’re also developing the mechanics of the game. Constant changes to your core flow will require retroactively adapting levels being built concurrently with a “vertical slice”.

With this knowledge in mind we can move to the next step.

2. The Mood Board

Not a huge amount of time spent here either but grabbing concepts and images of locations to help guide the tone/architecture of your level can help massively. If you’re building something in a real-world location (remember, you need permission to use some landmarks/buildings in a product!) then google images/maps is your best friend.

I like to base some parts of levels off of actual locations I have visited or artwork I have enjoyed. Get yourself to a gallery or go exploring with a camera sometimes instead of playing a game for inspiration, it will improve your work dramatically!

3. Blockout

You may have noticed I skipped 2D sketch. What I’ve found is that years of blocking out levels in 3D packages has made me much more proficient at quickly modelling a level than trying to draw it on paper. I don’t always skip 2D but I’d say for 90% of my levels I just jump straight into blockout phase.

With the portfolio of games I’ve worked on as well, verticality has been a large factor in the spaces I build. It’s just far more efficient to express these ideas in a 3D blockout than on paper. Also, the fact that you spend all your time for the rest of the project working in 3D, you might as well start getting good at blocking out a concept of acceptable quality, quickly.

Blockout

Built in Maya

In a professional environment, at all stages of the above steps, key stakeholders will be involved ranging from environment art and production to narrative and design. I like to pitch ideas to members of the team and begin collaborating as early as possible to find awesome ideas. The best ideas can come from anywhere in the team, so collaboration is an integral part to level creation in a studio.

After the blockout phase, at least on the last project I worked on, we pass blockouts to concept artists for any areas we feel will help assist the environment artists who ultimately model the level. It has also been common for environment artists to step in early, during blockout phases, so we can tweak areas early and get compositions, transitions and structures believable and correct.

The blockout phase is THE time to adjust the level. I have never shipped a level that looked exactly the same as the first blockout. During this phase I will be testing, tweaking and throwing out huge chunks of space. That’s why this phase exists!

The best bit of advice that was ever given to me regarding blockouts was “if you feel like you’ve done so much work that it would pain you to throw it all away, then you’ve gone too far“. Keep your blockouts light, a good lead or director will see past the untextured, rough shapes and see the ideas that need to be evaluated. (The space still needs to make sense however! Don’t take that as an excuse to become contrived).

4. Greybox

I’ve traditionally worked with two “blockout” phases. The first I’ve actually called “whitebox”, which is to evaluate the size and scale of volumes, objects and get some early composition, framing and high level beats. This is made out of mostly primitive shapes and can give a good indication of where the level is heading. After only a couple of iterations it can look close to the image above. As a level designer, I start to lock down areas I think work over the course of several weeks and iterate, iterate, iterate. Throwing away bad ideas, keeping new ones.

The next phase, known as greybox, is when we, the team, decide the level is sound from a design standpoint and can begin a more thorough art pass. My role here becomes more producer focused, while still building and testing gameplay. It’s important to ensure the key design ideas don’t get “lost in translation” as the level becomes more fully formed.

Greybox is harder to tweak and iterate, so we’d prefer to be in a place of confidence when this phase begins (but honestly it doesn’t always work that way). Changes can still be made in this stage, but they need to be meaningful and for the good of the game.

5. Final

This almost makes it sound too easy, but ideally after greybox we start to harden the level and bring it to final. Not all levels are brought to final at the same time, but at this stage it’s all about the polish. I’d love to say they’re all made this way, but the reality is with conventions, demos, publisher demos, reviews, tutorials and more it’s usually a bit more “seat of your pants” than effortless execution. The best games I’ve worked on were developed by passionate staff who did everything they could for the good of the game and that means juggling the sometimes hectic schedule of level creation.

tomb

Hopefully in the end it’s worth it (it almost always is).

Viva La Ludo Locomotion

maxresdefault
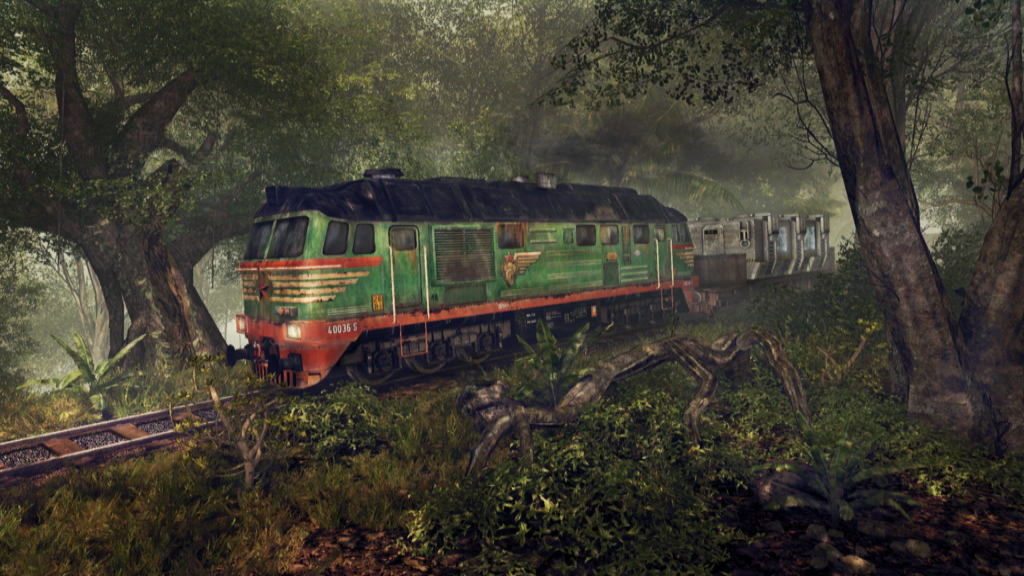
I really like trains. Not in a parka-wearing, notebook-wielding kind of way, but in a “this is the best way to travel, specifically if I have to travel between Dundee and Manchester” kind of way. You see some excellent scenery and fascinating people. I once sat adjacent to a gentleman on a train travelling from Stockport to Edinburgh who had booked a table seat so he could watch Rab C. Nesbitt VHS taps on the Combo-TV/VCR he had brought with him. Even the tinny sounds of Gregor Fisher bellowing through the carriage couldn’t dampen my mood on a train. It helps that the UK countryside is a marvelous source of inspiration, if you get a chance to actually see it through the rain and fog and trips to the small kiosk next to the toilets for a £5 bag of crisps.

Clearly level designers love trains as well, because they just keep showing up in games! And when they do, a twinge of excitement usually follows from yours-truly.

To that end here’s a list of my favorite train-based levels and some designery notes about them to keep it all above board and pretend I didn’t just want list some levels with trains in them like an absolute nerdling. I just hope I can get to the end of the list without running out of STEAM!

a9330e6a-a5e3-4c2a-a7a7-36324e5cfc4d-1020x612

Steam, like a steam train. Choo choo!

Uncharted 2 – LocomotionUncharted-2-train

Right lets get this out the way because it’s the first thing people think of now when they think about train levels, which, if you’re like me, is at least twice a day. This level floored me when I first played it and it set the (level crossing) bar for all future locomotive-based adventures.

Naughty Dog described this level as a “fully traversable set-piece” and had to develop new technology (the Dynamic Object Traversal System) to pull it off. They essentially produced a level within a level, where the player is traversing across a train as it speeds through the Nepalese mountains.

Like all the best levels, the result is a an experience that holistically fuses everything exciting about video-games: technology, story, agency and to top it all off it was beautiful to look at.

Level Design Notes

This level is not just a cool set piece but it is a great example, probably the clearest example, of Naughty Dogs design sensibilities (at least, at the time). The physical space the train inhabits represents a linear timeline of progression and pacing which we can observe when considering the layout of the vehicle alone. What the movement of the vehicle brings to the level, beyond simply looking and feeling epic, is that the “fall to death” areas (that are usually vast distances in the rest of the game) are now much shorter (falling off the train kills you). The result is a level that pushes the player to utilize Drake’s traversal set to progress over a tighter area, with hazards that can actually kill the player. This pushes the tension of the level up incredibly high. To add to that, the technology allows the train to bend and sway, moving the jump destinations around, making progress feel tense and dangerous.

Crysis: Warhead – From Hell’s Heart

Train_loading

I’m a bit biased here because of my history working at Crytek on the Crysis games, but this level, designed by Zoltán Katona, is just the ticket. Much like the Uncharted 2 example above, the scenario leverages the best principles of the game it lives in. In the case of Crysis, that comes in the form of nanosuit abilities such as super-jumping and super speed as well as the sandbox level design philosophy Crysis is famous for.

Level Design Notes

The player can board and disembark the train whenever they want using the super-jump, they can run off to get up close and personal with enemies in the distance then use super speed to catch up with the train again and they can utilize many of the sandbox options Crysis offers. For example, the train is armed to the teeth with mounted weapons and, again like Uncharted, physically moves through the game world. The result is a moving unit of destruction with the player as the conductor. A real joy to play.

Red Dead Redemption

One of my favourite games of all time, as a huge fan of westerns this game just runs through the list of western fantasies we’re all familiar with in a giant seamless open world. It feels like a cheat to call the entire open world a “train level”, but it is a level and it does have a train moving through it so you can fulfill all your fantasies of train robbing and executing bandits by hog tying them and laying them on the tracks. I want to give a special mention to one particular mission however…

Rdr_american_imperialism

Red Dead Redemption: Undead Nightmare – American Imperialism

  • Cowboys? Check
  • Zombies? Check
  • A motherflippin’ TRAIN? Check!

Level Design Notes

Like Crysis: Warhead, you’re escorting the train through the wilderness fighting off enemies. Unlike Crysis, however, those enemies are zombies and they arrive in hordes! This insane mashup is just a brilliant slice of fun that really utilizes Rockstars open world systems, great arsenal of western weaponry and plain fun mission design. While you can jump on and off moving locomotives in the open world at any time, this mission makes it the focus and keeps you engaged.

Timesplitters: Future Perfect – The Khallos Express

TS3-screen06

More bias, there’s a reason I wanted to work for Free Radical and that was down to the awesome TimeSplitters series. Future Perfect is often overlooked due to the milestone achievement that was Timesplitters 2, but my memories of the third installment are just as fond, late nights playing split screen on the Gamecube with friends.

Oh yeah and Future Perfect HAS A TRAIN LEVEL which makes it THE BEST TIMESPLITTERS, END-OF.

Level Design Notes

This level excels in continually keeping up the excitement. It starts off with some stealth, moves into tight corridor shooting, out into the open for some frantic action and follows with multiple setpieces including a chopper, wormholes, a SECOND train, puzzles and a jetpack flying boss fight. The levels tempo is set by the great music track which follows the action brilliantly.

This level also includes the remote control cat “Strudel”, which is worth mentioning just for sheer novelty alone.

Realistically Textured

Realistically textured and all

Gears of War – Train Wreck

On paper, there’s nothing that a train brings to Gears of War other than sheer novelty. In practice, it just works. The momentum of the rhody run coupled with a level that is itself charging through the environment adds a satisfying level of empowerment to the already JUICED Gears of War protagonists.

At first it seems like standard Gears of War fare, cover shooting as you make your way up the train carriages.

And then they throw this hackit bastard at you…

Hiya pal

Hiya pal

And suddenly it becomes clear why the level designer put you on a train.

This is a brilliant example of how Epic took the established mechanics of the Berserker boss fight and married them up with an environment that enhances the tension of the encounter. Ultimately it’s a simple one, but it’s a great twist to kick off the level.

The mechanics of Gears work wonderfully on all sections of the level. The trope of the chopper enemy is replaced with the, suitably Gears, “Reaver”. These come in waves and add an element of verticality to the action.

reaver


After some open-air shooting the level progresses into the tight corridors of the carriages. Here the level designer chooses to throw lambent at the player, enemies that are very dangerous in close quarters. The mechanics of Gears put to great use once again. Suddenly the momentum from earlier is put into question as the player cautiously approaches new carriages and unseen corners in a tight space such as a train this raises the tension even higher.

3

Special mention here to ending the game ON the train with the final boss fight. If you thought it was odd that the Berserker was thrown at the player at the start of the level, this is why. The boss uses all the previous mechanics of the level, so it turns out the level was a great way to make sure the player had a paced progression through the core features that would make up the finale.

222


End of the Line

Something inherent in all the levels mentioned that permeates through each experience is the concept of a “destination”. The idea that all this momentum is destined to end, one way or another, creates a sense of urgency in these levels. It adds a concept of a timer to the players experience often without literally showing a countdown. I believe this diegetic form of a timer – the physical passing of the environment – is an incredibly strong and implicit way to raise the tension in a game and can be used for a spike in pacing and tempo.

It also helps that trains are awesome.Timetrain

An honorable mention at the end here for Resistance 3 – The Train to New York.

This level uniquely utilizes the concept of a hold out and a moving level to create fantastic set pieces. Backtracking to defend different sections of the train and the deterioration of cover keep it feeling fast, frantic and fun.