
Not a very exciting blog this time. When working on games in CryEngine (or other similar engines) it might be useful to lay out some standards for level entities and scripts. This is based on years of experience working in CryEngine, but is probably woefully out of date by now.
Hopefully you find it useful, even just to see how professional levels are organized!
Layers
Levels are split up into sections known as “Action Bubbles”.
- An action bubble is an area within the map that has clearly defined boundaries.
Areas that connect action bubbles are “Transitions”.
- These can also sometimes be referred to as “Gates” or “Valves” and have technical considerations for the loading/streaming of action bubbles.
Any assets that are not specific to an Action Bubble are placed on a “Global” layer.
- Global layers contain level-wide assets such as skyboxes, ambient sounds or global logic.
Layer Naming and Categories
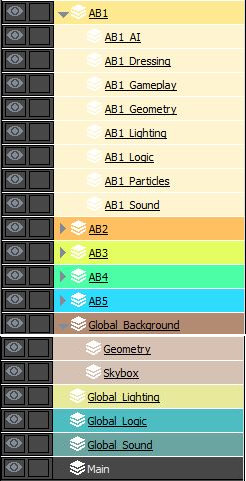
- ABX = The parent of all the layers that make up an Action Bubble (AB).
- ABX_AI – All AI related assets are placed within this layer. This includes actors, AI vehicles, waves entities, territory entities, tag points involved in pathing, navmesh markup, smart objects and any areas or triggers related to AI setup.
- ABX_Dressing – Art layer. All objects used to dress the action bubble are placed here. Physics objects, decals, small objects etc
- ABX_Gameplay – All assets that the player can interact with inside the action bubble should be placed in this layer. Player vehicles, switches, triggers, interactive doors, items, pickups, collectibles, ammo etc
- ABX_Geometry – All static geometry that relates to this action bubble is placed in this layer. Brushes, geom entities, large physics objects etc. This is primarily an “Art” layer.
- ABX_Lighting – All lighting related assets placed here. Lights, environment probes, physics objects with lights attached etc
- ABX_Logic – Contains the Flowgraph Containers used to script the level. Can be used to store debug assets during level creation.
- ABX_Particles – Contains all particles used in the action bubble.
- ABX_Sound – Contains all the sound information for the action bubble.
- Global_Background = The parent layer for all the background assets in the level
- Geometry – Any objects that make up the background scene go here.
- Skybox – If the skybox is made up of more assets than the environment tab (e.g. hand placed nebula) these assets go here.
- Developers can add any additional layers here that are requires for the background of the level that need to be split out.
- Global_Lighting = All global lighting assets are placed here.
- Global_Logic = Flowgraph containers and logic (triggers etc) that are used for the whole level go here.
- Global_Sound = Any level-wide sounds go here. E.g. Ambient tracks, ambient sound effects for outdoors etc.
Layer Properties
- Most layers require specific settings to comply with the standard working practises of CryEngine.

- Visible – Does the same thing as the layer hide/show icon.
- External – This is what generates the .lyr allowing for each layer to be tracked by version control individually. Without this checked, the layer still exists but only as part of the cry file. It is standard practise that ALL layers are external to allow for multiple designers to work on a single level.
- Export To Game – Required if the layer should be exported. Examples of layers that shouldn’t be exported are: Debug layers, layers that contain concept art references, temporary geometry layers.
- Brushes Have Physics – Brushes within a layer with this disabled will not have physics. This is good for distance background objects to save on performance.
Logic
Flowgraph Containers
- All scripting for the level is contained in Flowgraph Containers. While any entity can contain flowgraph, it is standard working practise to ONLY use the FlowgraphEntity as a container to write flowgraph in.

- It is good working practise to place all flowgraph containers at a point of the map that is easy to remember for good organisation.

Flowgraph Container Naming and Categories

- Remember: Containers are placed within the Logic Layer for their respective action bubble (or the global logic layer for the global flowgraph containers).
- Each container is prefixed with a corresponding number [Action Bubble][Type]. This allows us to order each action bubble folder in the same manner.
- ABX_Logic = The parent folder for all Flograph Containers for a specific action bubble.
- X0_DEBUG_FG – All debug logic for this action bubble is written in this container. This includes logic to “skip” parts of the level logic for testing, as well as any functions to enable god mode, spawn weapons or vehicles or anything else the designer needs to debug their level.
- X1_Gameplay_FG – All gameplay logic for this action bubble goes in here. Gameplay logic is any player related script. (E.g. player triggers, health, ammo, weapons, unlocks etc).
- X2_AI_FG – All AI related flowgraph goes in here.
- X3_Objectives_FG – All mission objective related flowgraph goes here. This is solely the logic required for the player to accomplish. The actual mission objective nodes will be covered later.

- X4_Dialogue_FG – All dialogue scripting goes in here. This includes cooperative AI conversations or player choice conversations.
- X5_Cinematics_FG – All cinematic related logic goes here. E.g. Trackview triggers, animation nodes, cinematic player controllers.
- Global_Logic = The parent folder for all global flowgraph logic. As well as per action bubble logic, we will require global tracking data for the entire level that is not explusive to a single event or area.
- Global_Debug_Logic_FG – Any debug logic that the designer wants to access for the entire duration of the level. E.g. “God mode”, “beam to location”, “toggle gravity”.

- Global_Gameplay_Logic – Player related data that you want to track for the whole level goes here. E.g. “Player At” systems are a way to detect where the player is in the level, which is useful for optimisation or streaming.

- Global_Objectives_Logic_FG – This is where the actual MissionObjective data is tracked. It is useful to contain all the actual objectives in a single container to more easily visualise the mission objectives.

- The conditions which actually trigger the objectives are still contained on a per-action bubble basis within the X3_Objectives_FG container.
Flowgraph Standards
Flowgraph Layout
- Flowgraph pages are massive! Due to this fact, there is no reason to squash your flowgraph together. Spreading out your flowgraph nodes makes it easier to read and debug (during debugging, flownodes will grow in size as variables are printed in them, which occasionally leads to overlapping).

- Make sure nodes are spread out and use comments as often as possible.
- Tip: Good comments explain WHY you are doing something, not WHAT. An observer can already see WHAT is being done by reading the flowgraph, but the WHY may be ambiguous.
- Always use comment boxes to organise your scripting and make it easier to read.
- The “fill” option that is on by default just makes flowgraph harder to read. It is best to turn this off unless you have deprecated flowgraph (see below).

- Try and colour code your comment boxes to make them easier to navigate.
- g.
- Orange – Debug
- White – Standard
- Red – Hack
- Blue – Prototype
- Purple – Dialogue
- Grey + Filled – Deprecated but not deleted
Game Tokens
Game Tokens allow designers to store variables and pass them between containers. They are incredibly powerful tools that make scripting cleaner and optimised when used correctly.
Guidelines For Usage
GameTokens should be used to optimise scripts and pass variables between containers. They can be used to store “states” that designers may need to reference throughout the level such as objectives, conversation choices or pickups the player has found.
The strongest example of GameToken usage is found in the objectives system. By setting a gametoken to “true” each time an objective is complete, we can then use those same gametokens in all of our containers to trigger new logic.
Naming

- GameTokens can get confusing and mixed up quickly, so it is important to clearly label your tokens and organise them.
- TurnedOn = true/false (Boolean)
- [Action Bubble]_[Purpose].[State] = true
- In this example we can see what the gametoken is being used for based on its convention. It stores the “state” of a switch that controls gravity in the level. The switch is located in the first action bubble, AB1.
- Gametokens are similar to flowgraph containers in that they should be organised between action bubbles, or in the global variables list.
- Gametokens can be created in the single level library OR we can create new libraries. It is sometimes cleaner to create a new library for each action bubble instead of piling all your gametokens in a single library (“Level”).
Objectives
Each mission in the campaign will provide a number of objectives for the player.
Setting these up requires a MissionObjective entity to be placed at the destination of the objective. This also acts as the in-world marker position for the HUD icon.
Naming
- MissionObjective entities are frequent throughout the level, and must be named properly so they are easy to manage.
- AB1_GetToTheChopper_MissionObjective
- This tells the developer that the mission objective “Get To The Chopper” is in action bubble 1.
- It may seem easier to NUMBER mission objectives, however this is not good for iterative design. When you need to add a new objective in between Mission 1 and Mission 2, you throw off your whole system For that reason, using unique names is better, and more explanatory.
- AB1_GetToTheChopper_MissionObjective
Debug
Tags
Tags are created in the level by pressing CTRL+F1/2/3/…
This stores a coordinate in the tags.xml file attached to the level.
You can press SHIFT+ the corresponding F key to jump to that coordinate at any time in the editor.
Per-Level Debug Script
It will be necessary for every level to have a fast debug jump through the level.
This must be set up by the designer so that pressing F2 (spawn) will jump the player character to the next objective and cleanly complete all the previous logic. Since the logic for each level is unique, it will be down to the designer to set this up on a per-level basis.